User Manual
menu Buttons
- Colorizer Icon Indicates the state of Logic. When the icon is white on a coloured background your theme is active in Logic Pro. When the icon is coloured without any background you will need to click the colorize button to activate it in Logic.
- Theme Selector This list displays all the themes sorted in categories. Bundle: contains the free themes that comes with a License. User: contains the themes you created. Purchased: contains the themesd designed by another user, purchased on the theme store.
- Duplicate Duplicates the theme selected in the theme selector.
-
Rename
Change the name of the theme selected in the theme selector. You cannot rename bundle themes. - Delete Deletes the theme selected in the theme selector.
- Theme Store Visit the theme store website to sell your theme or purchase themes from other users. You need a Vendor License in order to sell themes. You can upgrade your basic license to a vendor license here.
- Colorize Apply the current color change to Logic Pro.
- Import Theme Opens the finder and accepts lpxt files only.
- Export Theme Creates an lpxt file from the selected theme.
-
Virtual Editor
Easily locate and change the color and style of visual elements of Logic Pro user interface. -
Tree editor
Deletes the theme selected in the theme selector. -
Apply Default Color
Default color is the original color of your theme. The scope of this actionable button is contextual. In the top bar menu to the side of the theme selector dropdown, this will restaure the original style of the theme (bundle and imported). For the time being versioning of a new fresh theme is not available. Whenever you want to make a backup please use the export feature to keep a backup file of it. In the color editor popup window this will apply the Logic Pro's original color for the selected element. -
Color Palette
Edits Logic's Color palette. Those colors reflects on all the elements affected by Logic's color palette. (e.g track region color) -
Track Grid editor
Edits Logic's arrange window background. Change color and division lines colors.
Virtual Editor
The virtual editor view is a replication of Logic Pro’s user interface. Selecting visual elements from the virtual editor will bring up the element’s color editor. It is a intuitive and interactive way to create your theme based on direct visual feedback much like a graphic editor.

Browse through virtual windows from the virtual editor’s top bar
Tree Editor
The tree editor view is a hierarchical list representation of Logic Pro elements. They are named after the following logic’s nomenclature. This tree is based on previous versions of LP Colorizer (formerly called LPX Colorizer). Although we recommend using the virtual editor, you may find some elements are still missing. We continuously work on bringing more elements to the virtual editor, but in the meantime you can find those here. Eventually the tree editor may be removed once all the elements are accessible from the virtual editor and depending on user feedback. The tree view also brings a handy search feature that can filter elements based on name or color value (supports HEX or RGB).

Switch from color to text search mode
Color Palette Editor
The Color palette in Logic Pro uses HSB codification. Click a square to change the Hue value, and then the sliders to the side to controle the saturation & brightness.

Hue value slider
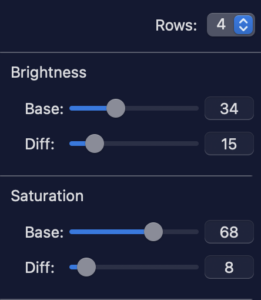
Saturation & Brightness
You can add more color options to the palette with the row selector.
Play with the base & difference options to set the brightness and saturation of the color.
Track Grid Editor
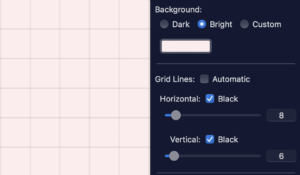
Pick a color for background, vertical and horizontal grid lines.
This windows extends Logic Pro’s project settings. Where logic give you only shades of gray you can here override those settings with colours and pure black & white.
Color editor
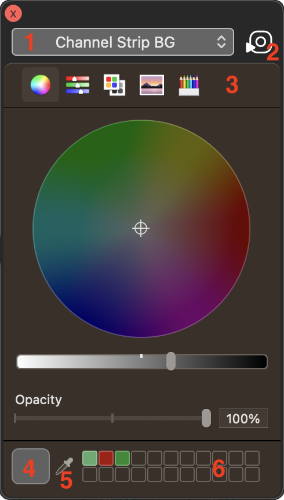
Pick a color for background, vertical and horizontal grid lines.
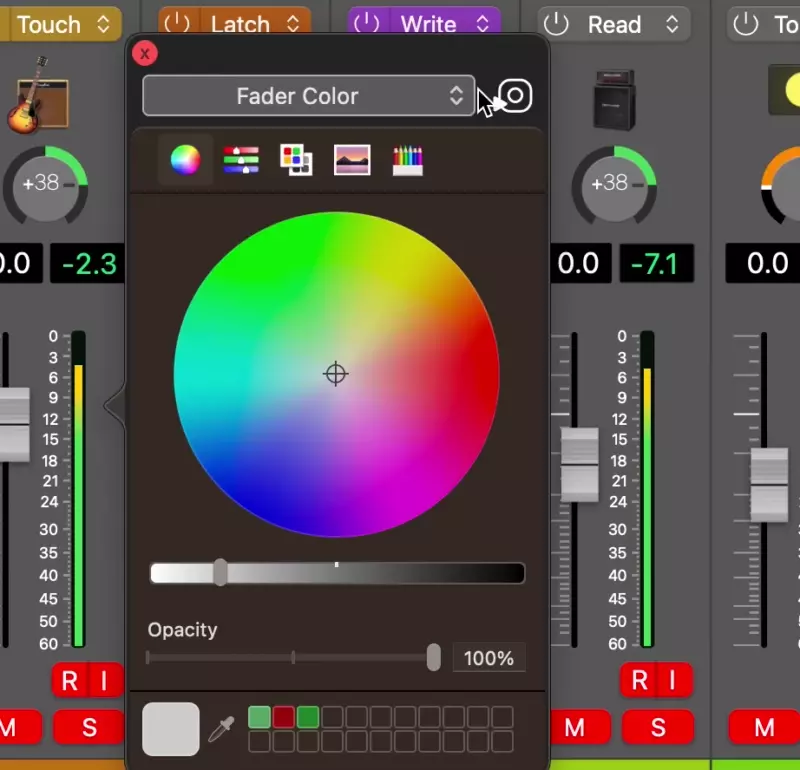
- 1. Element selector: when you see arrows in this dropdown menu, you can access mulitple elements linked to the selected one. It is an alternative solution to selecting elements manually where they are difficult to select even when zoomed in. (e.g borders). Additionally for some elements you will see in this menu an option called "select image". This allow you the change the styling of this element as presented here.
- 2. Apply the original default color for the selected element.
- 3. Color view selector: The 3 first tabs (color wheel, color sliders and theme colors) are the most useful ones and are describe in the section down below.
- 4. Current color thumbnail. You can drag and drop this color into the favorite color rack to the right (6)
- 5. Eye dropper tool: quickly select a color anywhere in your display.
- 6. Eye dropper tool: quickly select a color anywhere in your display.
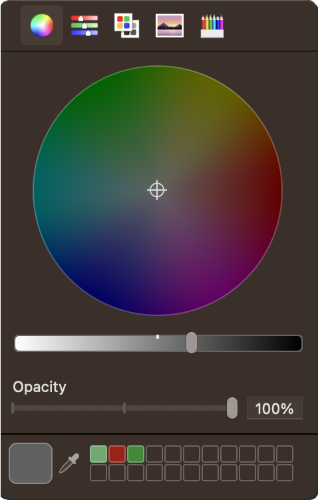
The color wheel view gives a cricular graphic representation of the color spectrum, drag your mouse over the wheel and adjust the tone (brightness/shade) with the bottom slider.
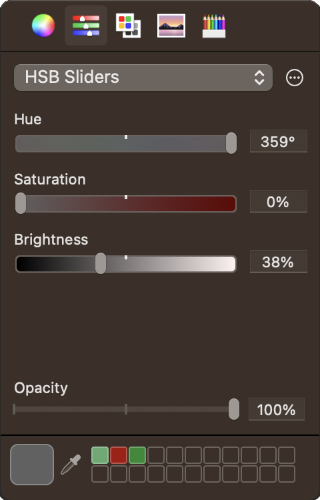
The color sliders view provides the code information about the currently selected color. You can use this code to seach the LPX Colorizer table, using Red, Green, Blue (R,G,B) : 72,73,231 or Hex : 4749E7 encoding.
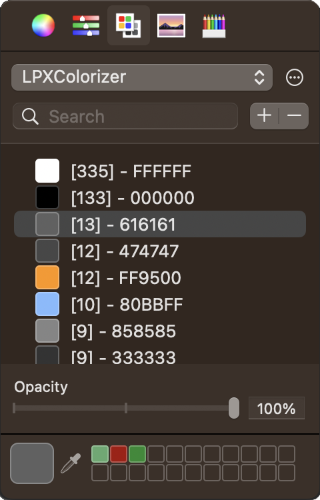
The Palette view gives you access to all the colors defined in you themes. The dropdown menu at the top lists all the themes of LPX Colorizer. The number of occurences correspond to the number of UI elements set to this color. This view helps batch colouring themes via the Find and Replace function as it dynamically gives you an idea on the overall look of your theme.
Custom styling
For some elements custom buttons, panners and faders are available.
From the element top dropdown menu pick the “select image option” and browse through the various styles available. (We may add new styles here in the future to provide more styling options).
Once the custom image is selected you can change its color normally from the color editor view.
Shortcuts
- ⌘ + S : Colorize !
- ⌘ + A: Selects all the colorizable elements displayed in the table (changing one color will reflect on all selected elements)
- ⌘ + H : Hide this application, LPX Colorizer is still running in the background and accessible from the cmd + tab menu
- ⌘ + ⇧ + H : Hide Others, display only the LPX Colorizer interface.
- ⌘ + Z : Undo the last performed action
- ⌘ + ⇧ + Z : Redo the last perfromed action
- ⌘ + C : Copy the highlighted element (table row) color value
- ⌘ + V : Paste the copied color value to the highlighted element
- ⌘ + ↓ : Expand the currently highlighted group of elements (in tree View))
- ⌘ + ↑ : Collapse the currently highlighted group of elements (in tree view)
- ⌘ + ⌥ + ↓ : Expand All the selected + sub elements groups (in tree view)
- ⌘ + ⌥ + ↑ : Colapse All the selected + sub elements groups
